Tutorial: Rolled Hem

Blogger: Deanna Mackin
Rolled Hem
Creating a rolled hem using a serger is a finishing technique that results in a sleek and professional hemmed edge. Rolled hems can be used to finish skirts, dresses and tops, exposed hem ruffles, flutter sleeves, bodice ruffle details and more. I used a rolled hem and a contrasting thread color to create a delicate exposed ruffle hem on the Lucerne dress pattern using a gorgeous floral fabric from Dusty Moon Fabrics.

Although several Little Lizard King patterns offer a rolled hem option, a pattern doesn't need to call for a rolled hem finish for one to be used. A rolled hem can be substituted for any standard hem by reducing the length of the pattern piece by the included hem allowance, which is typically 1/2" (1.3 cm). The extra length can be trimmed off when cutting out the pattern pieces or simply cut off using the serger blade while serging the rolled hem.
Only a few quick adjustments are required to the serger settings in order to stitch a rolled hem. The following tutorial instructions use woven fabrics and are done using the Brother 1034D- a popular entry level serger model. For any machine, it is best to consult the manual for setting recommendations and tutorials.
Start by clipping the thread of the left needle and removing the excess thread. Remove the left needle only by using the hex key/Allen wrench provided with your serger tools.
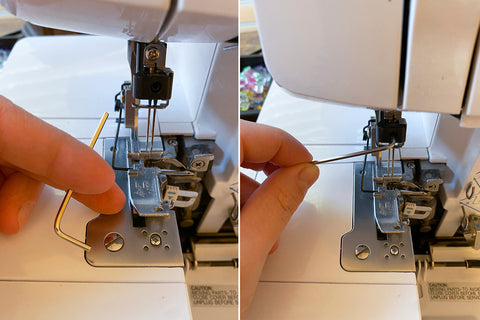
Open the front panel on the serger and remove the stitch finger by pressing on the small lever next to the yellow markings.

Turn the serger to access all of the side dials. The dial on the far left is called the Differential Feed. Set this to ".7". Right next to the Differential Feed is the Stitch Length Adjustment Dial. Set this to "R" for rolled hem. Turn the knife blade switch on. The final dial on the right is the Stitch Width Lever. Set this to "R" for rolled hem.

The final adjustments require changing the tension dials on the front of the machine. Since the left needle has been taken out, set this dial to "0." Set the right needle dial to "4." The dial directly next to the needle dials is the Upperlooper Thread Tension Dial. Set this dial to "5." The final dial, the Lowerlooper Thread Tension Dial, needs to be set slightly higher than the Upperlooper to allow the fabric to roll under slightly. Set this dial between "6" and "7" and adjust as needed. If the recommended settings for the serger are resulting in threads snapping, tension should be lowered on the Lowerlooper.

The serger is now ready to create a beautiful, rolled hem edge! Always test on scrap fabric first to find the perfect settings for your machine. Feed the fabric through with the right side facing up. When done correctly, there will be a continuous line of tight stitching across the entire hem. This is a close up finished front and back view.

Lightweight/sheer fabrics or fabric bases that fray easily such as linen may require more care for a rolled hem finish. Water soluble stabilizer can be used on top of the fabric or tissue paper can be used underneath the fabric while serging. Excess tissue paper can be torn off once complete. Another method that can be used is simply folding the fabric over so that the machine is serging over two layers of fabric with the fabric essentially stabilizing itself. To do this, iron the fabric 1/2"(1.3cm) to the back side with wrong sides together. Serge the edge using the rolled hem stitch. When complete, turn the fabric over to the wrong side and trim off excess fabric.

